
 [Click here to go straight to the recipe]
Since removing all the gluten from our home, I now have a new appreciation for our “daily bread.” At first, I was the only one not eating gluten, so I tolerated the Pamela’s Products mix and decided that it didn’t really matter if my bread tasted great or had a nice texture. The Pamela’s mix wasn’t bad, but it was very dense and quite a bit sweeter than I liked. Soon, however, we realized we needed to take all the gluten out of the house. Our “daily bread” suddenly became a big issue.
For the first couple of days the boys didn’t complain too much, but it wasn’t long before two-year-old Hosea just decided that he wouldn’t eat it. The other two boys didn’t refuse, but they were certainly less than enthusiastic. To make things more difficult, Kevin is a “recovering” diabetic (he is no longer taking medication, but controlling his diabetes solely with diet and exercise), and the Pamela’s bread is extremely dense. In order to make a sandwich with a good balance of protein and carbohydrates, he had to eat just half a sandwich stacked with the amount of meat and cheese he would normally eat on a whole sandwich. We definitely needed a new solution to the bread dilemma.
The first thing I tried was modifying the Pamela’s mix. I added various combinations of more liquid, more yeast, and more starches, but all my attempts completely failed. Several times, I ended up with gummy messes that were completely inedible.
Next, I tried the Gluten Free Cooking School Finally, Really Good Sandwich Bread recipe. This was a huge improvement over the Pamela’s, with a great flavor and light texture. My only complaint was that unless it was thickly sliced, any condiments like mustard or mayonnaise seeped through and got all over our hands. While this recipe was definitely my fall-back plan, I decided to keep looking.
One of Kevin’s favorite sandwich rolls (in the pre-gluten-free days) was Aunt Hattie’s Potato Hamburger Buns. With that in mind, I did a search for “gluten free potato buns” and came across a recipe for Gluten Free Potato Bread. This was a great base recipe for me to begin tweaking, and after much experimentation, I came up with a bread that my whole family loves. Not only can it still hold in the condiments when sliced thinly, but it is also light, soft, flavorful and stays fresh in the pantry for a few days. To top things off, one slice is just a little more than one carbohydrate exchange, which works well for the diabetic diet.
There are two things about this recipe that are different from most other gluten-free bread recipes: the size of the loaf and the baking method. Most of the bread recipes I have found make just one loaf, baked in a Large Loaf Pan. I resized my recipe to make two smaller loaves, baked in Medium Loaf Pans
. The baking method involves placing the loaves in a non-preheated oven (adapted from Carol Fenster’s French bread recipe) in order to speed up the baking time and get a thoroughly cooked loaf without over-browning the crust. I get great results every time, so let me know if this works for you!
 Gluten Free Potato Bread
2 ¼ cups warm water (about 110°F)
2 tablespoons active dry yeast
4 ¼ cups Esther’s Gluten Free All Purpose Flour Substitute
1 ½ teaspoons salt
1 ½ tablespoons xanthan gum
2 teaspoons baking powder (optional)
¾ cup instant mashed potato flakes
¾ cup instant nonfat milk powder
4 large eggs
3 tablespoons vegetable oil
¼ cup honey
-
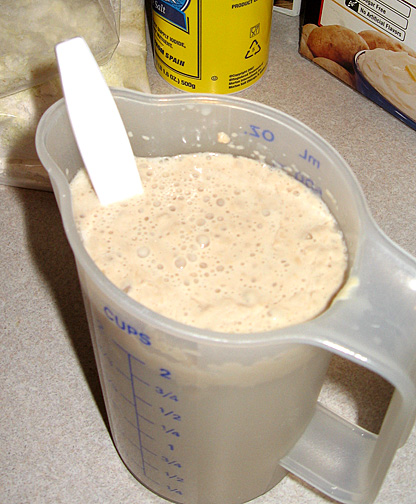
Proof the yeast. (Stir yeast into the warm water, and allow to sit for 5-10 minutes. Mixture should become foamy (
 photo); if it doesn’t, your yeast is not active and needs to be replaced.)
 -
While yeast is proofing, mix together dry ingredients in the bowl of your stand mixer. (I use a wire whisk to make sure everything is thoroughly combined. If the xanthan gum is not well incorporated before liquid ingredients are added, you will end up with gummy clumps that won’t disolve.)
TIP: During this step, you can make your own time-saving bread mix. Just place a ziplock bag next to your bowl, and each time you measure an ingredient into the bowl, put the same amount into the bag. Store these dry ingredients to use the next time you make bread. -
Add eggs, oil, honey and water/yeast mixture to dry ingredients.

-
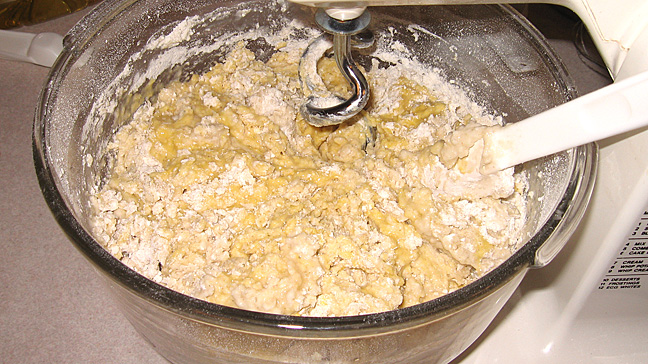
Using dough hooks, begin mixing on lowest speed until all ingredients are combined (
photo). Then, increase speed slightly and beat for about three minutes. (To me, the dough looks like regular yeast bread dough that still needs a cup or two of flour, or like a really thick quick bread batter.) -
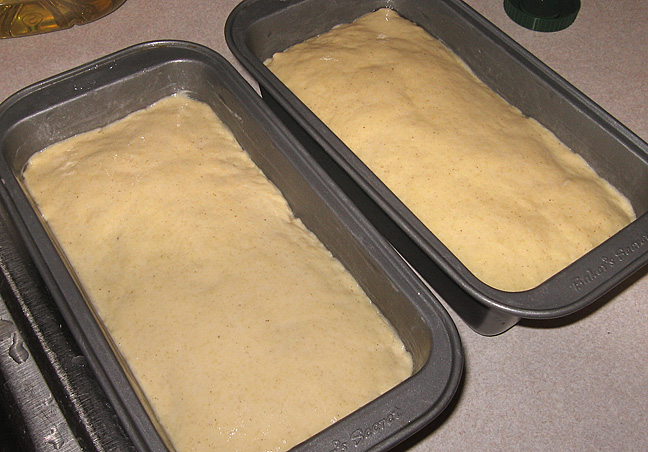
Divide dough equally into two, greased Medium Loaf Pans
(
photo). With wet hands, press the batter into the pan, smoothing the top as much as possible ( photo). You may need to periodically re-wet your hands. (For a softer crust, rub 1/2 teaspoon of oil on the top of each loaf.) -
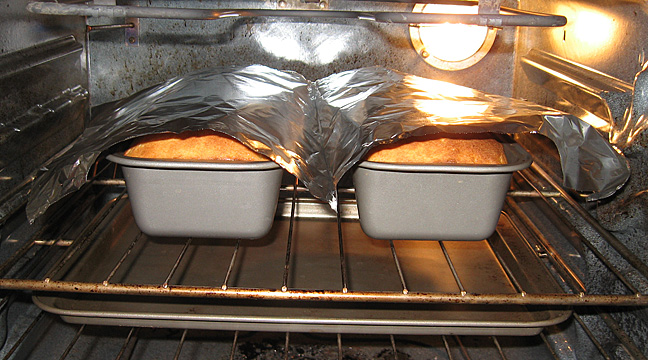
 Loosely cover pans with plastic wrap and let sit in a draft-free area for fifteen minutes. Then, remove plastic wrap, and place your bread pans on the middle rack of your oven (DO NOT PREHEAT). Set the oven to 425 degrees, and set a timer for 35 minutes. Check the tops at 25 minutes, and if they are browning too quickly, cover with an aluminum foil tent ( photo).
TIP: If the bottom crust of your bread browns too much, place a baking sheet on a second rack just below your pans to act as a heat shield.
-
Take bread from oven, and immediately remove loaves from pans and place on a wire rack. Cool completely before slicing.


I love this bread! We’ve tried store-bought gluten-free breads (the “best” was from Whole Foods, but it was almost $10 a loaf!), but they all had a somewhat grainy texture. They only really tasted like “bread” when they were toasted.
Not so with Esther’s bread — it tastes great, period!
The texture and flavor of Esther’s potato bread is fantastic — it’s moist, but not heavy, and is a pleasure to eat. I really can’t believe it doesn’t have gluten. It’s amazing! Who needs gluten?!?!
This bread looks and sounds really good! What are the exact dimensions of your loaf pans? I don’t want to buy the wrong thing.
Thanks!!
I hope the recipe works well for you! My medium loaf pans are 8 1/2″ x 4 1/2″ x 2 1/2″. I bought them at the grocery store, but if you can’t find them locally, they can also be purchased from Amazon.com (if you click the link where it says “Medium Loaf Pans” in the post above, it will take you to the exact pans I use).
Esther, you could be the next “Julia Childs” of gluten free baking and cooking. Your directions, photos and tips are excellent. You have a God-given literary gift and your dedication and generosity in helping others so wonderful. Keep up the great work… stay healthy! Jeanne Basye
Hi Esther – I’m lactose intolerant so is there a good substitute for the “instant non-fat milk powder” in this (your gluten free potato bread) recipie? THANKS!
Hi Deb – I’ve never used anything else, but I did a quick web search and saw some alternative milk powders. On Amazon, I found Vance’s Dari Free Original Powder , and Better Than Milk (Soy)
 . I would think you could find these types of powder at a local health food store as well. If you try it, I would love to hear how it turns out!
Hi Esther,
I just made this bread and omitted the milk powder and used almond milk in place of the water. I also used potato flour in place of the flakes as I have yet to find any flakes. Thanks for the recipes. It’s really good!
Esther, I have been searching for some good gluten free breads. I would like to try to make your potatoe bread with real potatoes. Can you tell me how much to use in place of your instant potaoes? I am milk intolerant as well as gluten intolerant. Thanks.
Hi Linda. I’ve never tried making it with regular mashed potatoes, so I can only tell you what I would do if I were experimenting. I would try using 1 cup of mashed potatoes, and taking out between 1/2 and 3/4 cup of liquid. Since you have trouble with milk as well, you could also try leaving out the milk powder, and using whatever substitute you prefer (rice, almond, or coconut milk) in place of the water. Since I’ve never tried this, I don’t know how well it will work, though. Hope your experimenting goes well. If you have good success, I’d love to hear about it so that I can pass it on to others!
Esther, I tried this and the bread was marvelous! My DIL said it’s the best bread she’s had 🙂 Thanks so much for sharing it!
I don’t have a stand mixer and they’re $200! Cannot spend that right now. Any suggestions?
Hi Dee, and thanks for stopping by. I know what you mean about stand mixers being so expensive! I’m currently using a very old Sunbeam MixMaster that was given to me by a friend. I’ve also used a small Kitchen Aid hand mixer that has dough hooks. The good news is that gluten free dough is not as tough on the mixer motors as regular dough, so you can get away with using something less powerful. The extended mixing with the dough hooks definitely affects the texture of the bread, so I would recommend trying to find something in a lower price range that will do the job. I saw this Sunbeam Hand and Stand Mixer that has good reviews and a great price point. Although I haven’t used this particular model, it may be a good option for you. Many blessings!
Good morning.
Have you ever made this potato bread with real boiled potatoes then flakes? If I use real potatoes would I use the same amount?
I can not have yeast, how much would you say I should increase the baking powder?
Thank you for you receipe and your reply.
Marg
Hi Marg, and thanks for visiting. I’ve never tried regular potatoes, but I did make some recommendations in a comment above about where I would start experimenting if I were to try it. Regarding the yeast, I really have no idea if it would work. I know that yeast and baking powder result in extremely different textures. The baking powder in this bread is really only to help keep it from sinking when it comes out of the oven, as apposed to being the main leavening agent. With just baking powder, I would assume you would end up with a more crumbly texture that dries out very quickly. I know I’ve seen recipes for gluten-free, yeast-free breads out there, so if you find one that works pretty well, you could use that as a general guideline for modifying this recipe. I hope you have some great success! Blessing to you!
I made this bread just the other day for a girl I am dating, and she absolutely loved it, saying it’s the best gluten free bread she’s ever had. Thank you very much for this recipe, and I hope to see more recipes soon.
Hi Esther,
I’m going to give this a whirl this morning – maybe make into Potato Rosemary bread which is one of my favorites.
One thing . . . for the pan size, the Ekco 1164070 is variously described as a Medium or Small – even on that linked page – but I think you’re recommending an 8-1/2″ x 4-1/2″ x 2-1/2 pan, right ?
That is, 8-1/2? x 4-1/2? x 2-1/2, measured across the top.
That size turned out to be right.
I gave it to my nephew who has the gluten intolerance issue.
He absolutely loved it – the email I got back was so ecstatic, it’s not exactly printable.
I divided the dough in half, added 1-1/2 teaspoons of rosemary to one half, then put both halves back in the pan and baked it.
He said it was all good, but the rosemary half was the best.
So for a full loaf, that’d be 1T of rosemary.
Thanks again for the recipe.
Kent, sorry I wasn’t able to get back to you quickly with an answer to your question, but I’m so glad to hear that it turned out well! Yes, that is the pan size I use, and the addition of rosemary sounds great. Thanks for letting me know your experience!
My kitchenaid is kind of out of commission, can I put this in my bread machine on the dough cycle?
The bread machine would probably work, although you may have to babysit it a little to make sure it is mixing well. I would recommend scraping down the sides of the pan with a rubber spatula a couple of times during the kneading process. Gluten free breads don’t usually pull the dough back down the sides of the pan in exactly the same way that gluten breads do. Hope it works well for you!
Esther,
Thanks so much for the recipe. I just took some out of the oven, and I am in heaven! I used 1 1/4 cup of mashed potatoes, 1 cup milk and 1 cup water. Instead of the potatoe flakes and milk powder. I also added 2 teaspoons of gelatin. Not sure what it does but I use it in my millet bread. I didn’t get my dough divided evenly so the larger loaf took longer,but it is soft and fluffy. Nice change from millet bread. Been gluten free for 4 months, and getting better at this baking. It really easier than baking with wheat! Thanks again
Hi Denise, I’m so glad to hear that your bread turned out well! It’s great to hear that it worked with regular mashed potatoes instead of the flakes. Thanks for letting me know!
After it cooled, it was actually too heavy and moist. Gonna try again using a baked potato. Mitt be easier to get the liquid right. Flavor was wonderful. Thanks.
Dearest Esther,
Thank you so much for posting this recipe. We baked our second loaf yesterday, and it actually came out better than the first one! My husband told me and my older son, who had baked the loaf, that this bread is the best of all the ones we have tried so far. We used to have issues with bread getting hard in the fridge for his lunch, and this one is simply perfect no matter what we use it for.
Today we piped it onto a cookie sheet for hot dog rolls. I just can’t believe what a wonderful, versatile batter this is turning out to be.
Oh, and instead of 2 smaller loaves, we have been baking it in a large Wilton bread pan. My guys like large sandwiches. 😉
I have to agree with the other posters in that this appears to be the best GF Potato bread recipe on the web. I scaled the recipe back by 3/4 and baked the bread in a 9X4X4 King Arthur Flour bread pan at 350 degrees F for 40 minutes. I also substituted Sprouted Brown Rice flour for the GF flour blend and Konjac root powder as the xanthan gum substitute, organic sugar in place of the honey, one packet of active dry yeast, and 4 tablespoons of softened butter in place of the vegetable oil. I also followed the KAF tender high rising gluten free bread recipe procedure for making the bread dough/batter with a hand mixer. So far, I have no blood sugar or digestion problems to report, and the bread came out exactly like what is shown in the pictures.
I boiled potatoes for dinner, saved the potato water and used it for this recipe. I also ground mashed potato flakes to make potato flour. Delicious!
Esther,
Thank you for coming up with these great recipes! All praise to the Lord! I really appreciate you sharing and look forward to trying this bread after Passover/Matzah. We already love your matzah recipes. Your family is very blessed to have such a great cook/baker in the family. Shalom
Shalom Michelle, thank you for your kind words! I pray you have a wonderful Passover and Feast of Matzah, and I hope the receipe turns out well for you when you try it. Many Blessings!